


21
QL Series User Guide
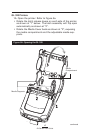
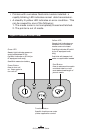
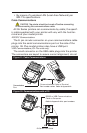
Operator Controls
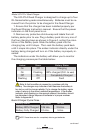
QL Series printers are available with one of two possible
control panels. The standard control panel is detailed below
and in Figure 9. The optional control panel (Figure 10) fea-
tures an LCD which allows easy display and selection of many
printer functions detailed on following pages.
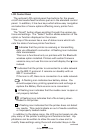
Standard Keypad
The standard keypad has three control buttons and two mul-
tipurpose indicators.
• The Power button turns the printer on and off.
• The Feed button advances a length of media which is
determined by the type of media being used. Label
media will be advanced to the next gap or bar sense
marker. Journal (plain) media will be advanced a length
determined by the printer’s software.
• The Function button is controlled by a printer’s specific
application to support such functions as:
Print a battery level report.
Print the Local Area Network (LAN) status
Print a Short Range Radio Frequency (SRRF) status
Print a media supply report
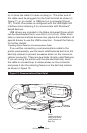
The green LED on the left side of the control panel indicates
the status of several printer features:
•A slowly blinking sequence indicates the printer’s battery
needs charging.
•Printers with a wireless QuickLink module installed: a
quickly blinking sequence indicates the printer has not
established a link to either a Local Area Network or a
compatible wireless equipped terminal.
•Printers with a wireless QuickLink module installed: A
steadily lit indicator shows that the printer has established
a wireless link, either to the LAN or to a compatible
terminal.
A steadily lit green indicator on a non-wireless printer is a
power-on indicator.
The yellow LED on the right side of the control panel has
two indication conditions.
•A rapidly blinking yellow LED and a chime indicate that no
application has been loaded into the printer.
continued