


26
QL Series User Guide
Verify the Printer Is Working
Before you connect the printer to your computer or portable
data terminal, make sure that the printer is in proper working
order. You can do this by printing a configuration label using
the “two key reset” method. If you can’t get this label to print,
refer to “Troubleshooting”.
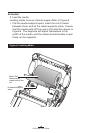
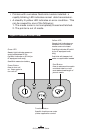
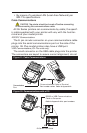
Printing a Configuration Label
1. Turn the printer off. Load the media compartment with
journal media (media with no black bars printed on the
back)
2. Press and hold the Feed Button.
3. Press and release the Power button and keep the Feed
button pressed. When printing starts, release the Feed
button.
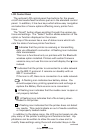
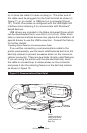
The unit will print a line of interlocking “x” characters to
ensure all elements of the print head are working, print out the
version of software loaded in the printer and then print two re-
ports.
The first report indicates model, ROM version, serial num-
ber, baud rate, etc. The second report prints out more de-
tailed information on the printer’s configuration and parameter
settings. If no second report appears, there is no application
loaded. (See the Troubleshooting Section for sample printouts
and a further discission on how to use the configuration label
as a diagnostic tool.)
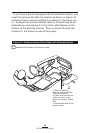
Connecting the Printer
The printer must establish communications with a host ter-
minal which sends the data to be printed. Communications
occur in four basic ways:
• By a cable between the printer and its host terminal. All
QL Series printers communicate by the RS232C protocol.
QL Plus Series printers can communicate by either
RS232C or USB 2.0 protocols. (USB drivers are included
in the Zebra Universal Driver which can be downloaded
from
www.zebra.com/drivers).
• Linking to a host terminal via Infrared (usually by means
of the industry standard IrDA protocol)
• By means of a Bluetooth™ short range radio frequency
link.