


24 X5v Quick Start
IP address 10.0.0.16
Subnet mask 255.255.255.0
Default gateway (X5v’s LAN IP address) 10.0.0.2
Preferred DNS server 10.0.0.2
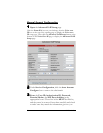
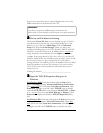
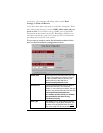
For Windows 98 and Me Users:
Click Specify an IP Address and enter the settings for IP
Address and Subnet Mask shown below, unless you chose an
IP address in Step 2 other than 10.0.0.16, in which case you
should enter the number that you chose instead of 10.0.0.16.
IP address 10.0.0.16
Subnet mask 255.255.255.0
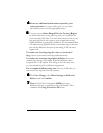
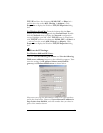
Now click the DNS Configuration tab at the top of the menu.
Then click Enable DNS. Enter any name (i.e., your name, the
words “My Computer”, a favorite word, or any other letters or
numbers) in the box labeled Host:. A Host: name is required.
Fill in the DNS Server Search Order box with the number
10.0.0.2 , click Add, and then click the Gateway tab near the top
of the page. When the Gateway screen opens, fill in the New
gateway: box with the number 10.0.0.2 and click Add.
5
55
5
Click OK.
6
66
6
Go back to the X5v’s Advanced Setup page and click
the Virtual Server button.
If you already closed the Zoom Configuration Manager, click on
the Zoom X5v icon on your desktop (or type 10.0.0.2 in your Web
browser) and click the Advanced Setup icon.
7
77
7
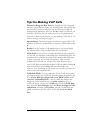
Configure the Virtual Server.
This is where you’ll need to enter the information that you got
from your gaming manual or the
www.practicallynetworked.com web site. Unfortunately, you
can only configure one port at a time. Each time you configure