


ZyWALL 5/35/70 Series User’s Guide
423 Chapter 26 DNS
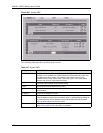
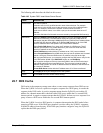
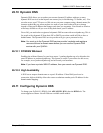
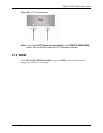
Figure 204 DNS DHCP
The following table describes the labels in this screen.
Table 151 DNS DHCP
LABEL DESCRIPTION
DNS Servers
Assigned by DHCP
Server
The ZyWALL passes a DNS (Domain Name System) server IP address to the
DHCP clients.
Selected Interface Select an interface from the drop-down list box to configure the DNS servers for
the specified interface.
DNS These read-only labels represent the DNS servers.
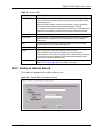
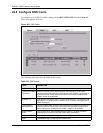
IP Select From ISP if your ISP dynamically assigns DNS server information (and
the ZyWALL's WAN IP address). Use the drop-down list box to select a DNS
server IP address that the ISP assigns in the field to the right.
Select User-Defined if you have the IP address of a DNS server. Enter the DNS
server's IP address in the field to the right. If you chose User-Defined, but leave
the IP address set to 0.0.0.0, User-Defined changes to None after you click
Apply. If you set a second choice to User-Defined, and enter the same IP
address, the second User-Defined changes to None after you click Apply.
Select DNS Relay to have the ZyWALL act as a DNS proxy. The ZyWALL's
LAN, DMZ or WLAN IP address displays in the field to the right (read-only). The
ZyWALL tells the DHCP clients on the LAN, DMZ or WLAN that the ZyWALL
itself is the DNS server. When a computer on the LAN, DMZ or WLAN sends a
DNS query to the ZyWALL, the ZyWALL forwards the query to the ZyWALL's
system DNS server (configured in the DNS System screen) and relays the
response back to the computer. You can only select DNS Relay for one of the
three servers; if you select DNS Relay for a second or third DNS server, that
choice changes to None after you click Apply.
Select None if you do not want to configure DNS servers. You must have
another DHCP sever on your LAN, or else the computers must have their DNS
server addresses manually configured. If you do not configure a DNS server,
you must know the IP address of a computer in order to access it.
Apply Click Apply to save your changes back to the ZyWALL.
Reset Click Reset to begin configuring this screen afresh.