


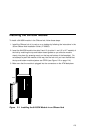
5. Fasten the spring-loaded screws on the front panel of the module to the hub using
your fingers. Do not over-tighten.
6. (optional) Press the LED Test button on the Controller module to verify that all
LEDs are functional.
7. If you want to use a local console to configure (out-of-band) the ATM subsystem,
you must attach an ASCII-type terminal to the RS-232 Console port on the 6416SW
module. The connection can either be local or via modems.
If you use the modem cables that are delivered with the ONcore hub, you must also
use the null modem adapter supplied with the 6416SW module.
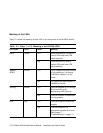
Verify that the console and modems (if used) meet the factory defaults of the
6416SW module. If they are not compatible with the factory defaults, you will not
be able to communicate with the module. The default 6416SW settings are:
9600 baud rate
8 data bits
No parity
1 stop bit.
See Chapter 4, “Setting-Up and Using a Configuration Console” on page 4-1 for
more information.
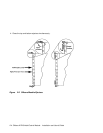
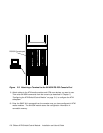
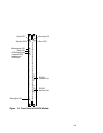
8. Attach one end of an RS-232 cable to the RS-232 Console port, the topmost
RS-232 port on the front panel of the 6416SW module. Loop the cable through the
hub cable tray (if installed) and attach the other end to the RS-232 serial port
connector on the console or personal computer.
Note: The RS-232 cable can be a maximum of 200 feet (61 meters) in length.
There are several RS-232 cable configurations available. Refer to Appendix B,
“RS-232 Cable and Modem Requirements” on page B-1 for more information on the
exact RS-232 cable that you need.
2-5