Installation
Installing the Probe
45
Table Installation
Use the following procedure to install the probe on a table:
1. Attach the self-adhesive rubber feet to the bottom of the probe as marked in
each corner.
2. Place the probe on a flat surface (refer to the requirements as listed in
“Selecting a Location” on page 43).
Rack or Cabinet Installation
You can install the probe in a rack or cabinet with either the front or rear panel
facing out. You may want the rear panel facing out so that you can see the status
LEDs for each port. (The front panel Fault and Activity LEDs indicate when the
10Base-T/100Base-TX telemetry interface LEDs are lit.)
Make sure you have screws that fit your rack (or cabinet) before installing the
probe as noted in Step 3 below.
Use the following procedure to install the probe in a rack or cabinet:
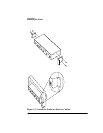
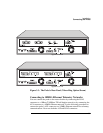
1. Attach the installation brackets to the probe with the 10-mm #M4 screws
(included), using a POZIDRIV #2 or cross-head screwdriver as shown in
Figure 3-1 on page 46.
2. Position the probe in the rack (or cabinet) and slide it up or down until the
rack holes line up with the holes in the brackets.
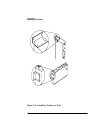
3. Attach the probe to the rack with the 5/8-in. #12-24 screws (included). Some
cabinets require 5/8-in. #10-32 screws (available as Agilent part number
2680-0302) instead of the 5/8-in. #12-24 screws.
Figure 3-1 on page 46 shows a rack or cabinet installation.


