


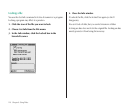
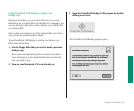
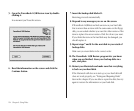


5. Open the PowerBook 145B Restore icon by double-
clicking it.
In a moment you’ll see this screen:
6. Read the information on the screen and click the
Continue button.
7. Insert the backup disk labeled 1.
Restoring proceeds automatically.
8. Respond to any messages you see on the screen.
If PowerBook 145B Restore finds an item on your hard disk
that is newer than an item with the same name on the floppy
disk, you are asked whether you want the older version of the
item to replace the newer version. Click the choice you want.
If you think the item on the hard disk may be damaged, you
should replace it.
9. Repeat steps 7 and 8 for the next disk in your stack of
backup disks.
Make sure you insert disks in the correct order.
10. The PowerBook 145B Restore program lets you know
when you are finished. Store your backup disks in a
safe, cool place.
11. Restart your Macintosh and make sure that everything
is back on your hard disk.
If the Macintosh still does not start up or your hard disk still
does not work properly, see “Testing and Repairing Disks”
later in this chapter. If you are able to repair the disk, then try
again to restore the information on your hard disk.
124 Chapter 8: Using Disks