


Chapter 2: Installation 9
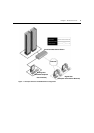
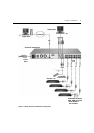
3. Connect the power supply to the power connector on your AVRIQ-SRL module. The cable
expander can be used to power up to four AVRIQ-SRL modules from a single power supply.
4. Connect the AVRIQ-SRL module power supply to a grounded AC wall outlet. Power up your
serial device.
Setting up your network for the on-board web interface
AutoView switching systems that have the on-board web interface use IP addresses to uniquely
identify the switch and the target devices. The AutoView switch supports both Dynamic Host
Configuration Protocol (DHCP) and static IP addressing. Avocent recommends that IP addresses
be reserved for each switch and that they remain static while the AutoView switches are connected
to the network.
Verifying the Connections
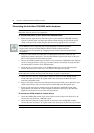
AutoView 3100/3200 switch
The front panel of the AutoView 3100/3200 switch features LEDs indicating the status of the
Ethernet connection:
• The green LED, labeled Link, illuminates when a valid connection to the network is
established at a rate of 1000 Mbps and blinks when there is activity on the port.
• The amber LED illuminates when you are communicating at a rate of 100 Mbps when using an
Ethernet connection.
• If neither LED is illuminated, connection speed is at a rate of 10 Mbps.
Additionally, the front panel of the AutoView 3100/3200 switch has LEDs for each port that
indicate the target device status:
• A green LED illuminates when the attached target device has power.
• An amber LED illuminates when that port is selected.
• The LEDs blink during a firmware upgrade.
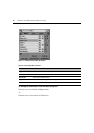
Configuring the Web Interface
You can access the AutoView 3100/3200 switch through the local peripherals or via an embedded
web interface. Before using the web interface to access the switch, first specify an IP address
through the SETUP port on the back panel of the switch. See
Chapter 6 for detailed instructions on
how to use the SETUP port to configure the switch.