


724-746-5500 | blackbox.com
Page 202
LGB5028A User‘s Manual
724-746-5500 | blackbox.com
Chapter 7: Security
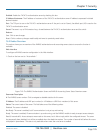
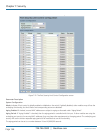
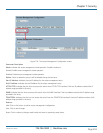
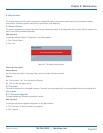
Figure 7-23. The Port Security Port Status screen.
Parameter Description
MAC Address & VLAN ID:
The MAC address and VLAN ID for this port. If no MAC addresses are learned, a single row stating “No MAC addresses
attached” is displayed.
State: Indicates whether the corresponding MAC address is blocked or forwarded. In the blocked state, it will not be allowed to
transmit or receive traffic.
Time of Addition: Shows the date and time when this MAC address was first detected on the port.
Age/Hold: If at least one user module has decided to block this MAC address, it will stay in the blocked state until the hold time
(measured in seconds) expires. If all user modules have decided to allow this MAC address to forward, and aging is enabled, the
Port Security module will periodically check that this MAC address still forwards traffic. If the age period (measured in seconds)
expires and no frames have been detected, the MAC address will be removed from the MAC table. Otherwise, a new age period
will begin.
If aging is disabled or a user module has decided to hold the MAC address indefinitely, a dash (-) will be shown.
Auto-refresh: Check the box next to “Auto-refresh” to refresh the information automatically.
Upper right icon (Refresh): Click on the “Refresh” button to refresh the Port Security Port Status information manually.
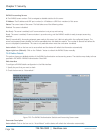
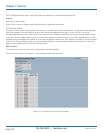
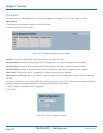
7.8 Access Management
This section shows you how to configure the access management table of the switch including HTTP/HTTPS, SNMP, and TELNET/
SSH. You can manage the switch over an Ethernet LAN or over the Internet.
7.8.1 Configuration
This section shows you how to configure the access management table of the switch. The maximum entry number is 16. If the
application's type matches any one of the access management entries, it will allow access to the switch.
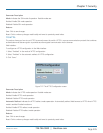
Web Interface
To configure an access management configuration in the Web interface:
1. Select “Enabled” in the Mode of Access Management Configuration.
2. Click “Add new entry.”
3. Specify the Start IP Address, End IP Address.
4. Checked Access Managemnet method (HTTP/HTTPS, SNMP, and TELNET/SSH) in the entry.
5. Click “Save.”