


22
Printing a label
1 Turn on the PT-2420PC and start up the computer.
2 Start up either P-touch Quick Editor or P-touch Editor Ver. 3.1, and make sure that the PT-2420PC
is selected as the printer.
3 Design your label.
4 Start printing the label. The status indicator of
the PT-2420PC flashes while it is receiving
the data. After the label is printed, press in on
the tape cutter button to cut off the label.
While printing multiple copies, the PT-
2420PC may stop printing for a short
while in order for the print head to cool
down. Printing will continue once the
print head has sufficiently cooled down.
To feed out extra tape, hold down the
Power/Feed key for a few seconds.
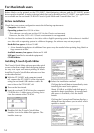
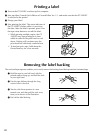
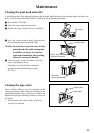
Removing the label backing
The enclosed tape separator enables you to easily remove the backing from labels printed on laminated tape.
1
Hold the tape in your left hand, with the
printed surface facing up, and hold the stick
in your right hand.
2
Pass the tape halfway through the long
narrow hole in the stick.
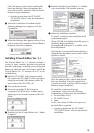
3
Turn the stick three-quarters of a turn
towards you, and then pull the stick away
from you as shown in the illustration.
4
Peel off the label backing.
GH
ABCDEF
ABCDEF