2-20 SmartSwitch ATM User Guide
Creating an Emulated LAN IP Over ATM and LANE
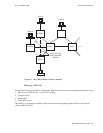
1. On both SW1 and SW2, enter the stop lecs command to make sure each LECS is down
SW1 # stop lecs
Confirm(y/n)?:y
NOTICE - 'LECS' ***** LECS shutdown *****
SW1 #
2. On both SW1 and SW2, enter the stop les command to stop each switch’s LES and BUS
SW1 # stop les
STOPPING LES/BUS
Confirm(y/n)?:y
NOTICE - 'ZLESSRV' ***** LES shutdown *****
SW1 #
3. On both SW1 and SW2, enter the set lnniinfo command to assign a number to each switch’s
LECS. Make sure that each
LECSID is unique.
SW1 # set lnniinfo
LECSID(-1) : 0
— On SW1, LECSID will be zero
SW1 #
Similarly, on SW2, enter the set lnniinfo command, specifying a different LECSID for SW2
SW2# set lnniinfo
LECSID(-1) : 1
— On SW2, LECSID will be one
SW2 #
Note The default LECID -1, indicates that the LECS is not used on this switch. The
default value (-1) is used as the
LECID on switches participating in LNNI that are
running only the LES/BUS (see next section, “Configuring LNNI Distributed
LES/BUS servers
”).
4. On both SW1 and SW2 enter the set lnnistatus command to enable LNNI and SCSP (Server
Cache Synchronization Protocol).
SW1 # set lnnistatus
LNNIStatus(Disabled) : enable
SCSPStatus(Disabled) : enable
SW1 #
Enter the show lnnistatus command to make certain that LNNI has started on each switch
SW1 # show lnnistatus
LNNI Status : Enabled
SCSP Status : Enabled
SW1 #
5. On both SW1 and SW2, use the start les and start lecs commands to start LANE services
SW1 # start les
NOTICE - 'ZLESSRV' ***** LES started *****
SW1 # start lecs
NOTICE - 'LECS' ***** LECS started *****
SW1 #


