


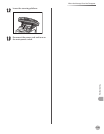


12-25
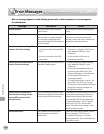
Error Messages
Troubleshooting
Message Description Action
Cannot find the selected server.
Check the settings.
The IP address that the machine
should connect to cannot be
determined.
– Check the DNS (Domain Name
System) server settings. (See “Network
Settings,” in the e-Manual.)
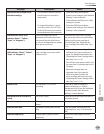
–
Check whether the DNS server’s DNS
settings are correct.
–
If <Login Information> is set to
<Use (Sec. Auth.): Ver 3 (UTF-8)>
for the LDAP server, the machine
cannot determine the host name.
– Check the DNS (Domain Name
System) server settings. (See “Network
Settings,” in the e-Manual.)
–
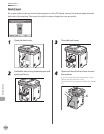
Check the XXX toner. (XXX
indicates “Black”, “Yellow”,
“Cyan”, or “Magenta”.)
A toner cartridge that cannot
guarentee print quality because it
has reached the end of its life etc.,
or a toner cartridge that has already
been spent may be set.
Continued use of this toner cartridge
may cause the machine to malfunction.
Replacing of the toner cartridge is
recommended. (See “Replacing the
Toner Cartridge with a New One,” on p.
11-8.)
Check the XXX toner connection.
(XXX indicates “Black”, “Yellow”,
“Cyan”, or “Magenta”.)
There may be a problem with the
toner cartridge connection of the
indicated color.
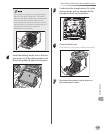
Take out the toner cartridge of the
indicated color, then properly set it
again. For detailed instructions, (see
“Replacing the Toner Cartridge with a
New One,” on p. 11-8.)
–
Turn OFF the main power switch, wait
for more than 10 seconds, then turn it
ON again.
–
When this message does not
disappear even if you take the
above procedures, replace the
toner cartridge with a new one (see
“Replacing the Toner Cartridge with a
New One,” on p. 11-8.)
–
Check TCP/IP. The machine’s TCP/IP is not
operating.
Check the IP Address Settings in
<Network Settings> in <System
Management Set> (from the Additional
Functions screen). (See “Network
Settings,” in the e-Manual.)
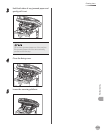
Check that all of the covers are
closed.
The cover is open. Check the cover and make sure that it is
completely closed.
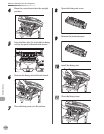
Check the originals. The original is not correctly set in the
feeder.
Correctly set the original in the feeder.
Clean the scan area. The feeder scanning area may be
dirty.
Clean the feeder scanning area (see
“Scanning Area,” on p. 2-
3), then press
[OK].
Clear the output tray. Output paper is piled up on the
output tray.
Remove the output paper from the
output tray.