


3-11
Cisco Catalyst Switch Module 3110 and 3012 for IBM BladeCenter Software Configuration Guide
OL-12189-01
Chapter 3 Assigning the Switch IP Address and Default Gateway
Assigning Switch Information
Note The configuration file that is downloaded from TFTP is merged with the existing configuration in the
running configuration but is not saved in the NVRAM unless you enter the write memory or
copy running-configuration startup-configuration privileged EXEC command. Note that if the
downloaded configuration is saved to the startup configuration, the feature is not triggered during
subsequent system restarts.
Configuring the DHCP Auto Configuration and Image Update Features
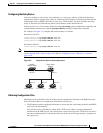
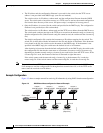
When using DHCP to download a new image and a new configuration to a switch, you need to configure
at least two switches:
• One switch acts as a DHCP and TFTP server.
• The client switch is configured to download either a new configuration file or a new configuration
file and a new image file.
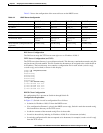
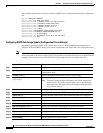
Configuring DHCP Autoconfiguration (Only Configuration File)
Beginning in privileged EXEC mode, follow these steps to configure DHCP autoconfiguration of the
TFTP and DHCP settings on a switch to download a new configuration file.
Command Purpose
Step 1
configure terminal Enter global configuration mode.
Step 2
ip dhcp poolname Create a name for the DHCP Server address pool, and enter DHCP
pool configuration mode.
Step 3
bootfile filename Specify the name of the configuration file that is used as a boot image.
Step 4
network network-number mask
prefix-length
Specify the subnet network number and mask of the DHCP address
pool.
Note The prefix length specifies the number of bits that comprise
the address prefix. The prefix is an alternative way of
specifying the network mask of the client. The prefix length
must be preceded by a forward slash (/).
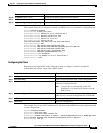
Step 5
default-router address Specify the IP address of the default router for a DHCP client.
Step 6
option 150 address Specify the IP address of the TFTP server.
Step 7
exit Return to global configuration mode.
Step 8
tftp-server flash:filename.text Specify the configuration file on the TFTP server.
Step 9
interface interface-id Specify the address of the client that will receive the configuration
file.
Step 10
no switchport Put the interface into Layer 3 mode.
Step 11
ip address address mask Specify the IP address and mask for the interface.
Step 12
end Return to privileged EXEC mode.
Step 13
copy running-config startup-config (Optional) Save your entries in the configuration file.