


3-7
Cisco MDS 9100 Series Hardware Installation Guide
OL-16187-01
Chapter 3 Connecting the Cisco MDS 9100 Series
Connecting to a Fibre Channel Port
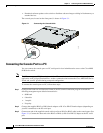
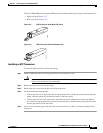
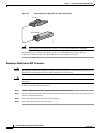
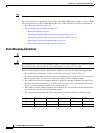
Figure 3-5 Alternate Removal Method for Bale Clasp SFP Transceivers in the Cisco MDS 9140
Switch and the Cisco MDS 9120 Switch
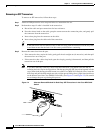
Step 4 Insert a dust cover into the port end of the transceiver and place the transceiver on an antistatic mat or
into a static shielding bag if you plan to return it to the factory.
Step 5 Protect the optical cage by inserting a clean cover if another transceiver is not being installed.
Removing and Installing Cables into SFP Transceivers
Caution To prevent damage to the fiber-optic cables, do not place more tension on them than the rated limit and
do not bend to a radius of less than one inch if there is no tension in the cable, or two inches if there is
tension in the cable.
Installing a Cable into an SFP Transceiver
Caution To prevent possible damage to the cable or transceiver, install the transceiver in the port before installing
the cable in the transceiver.
To install a cable into a transceiver, follow these steps:
Step 1 Attach an ESD-preventive wrist strap and follow its instructions for use.
Step 2 Remove the dust cover from the connector on the cable.
Step 3 Remove the dust cover from the cable end of the transceiver.
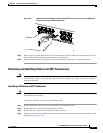
Step 4 Align the cable connector with the transceiver and insert the connector into the transceiver until it clicks
into place. (See Figure 3-6).
115237