


92
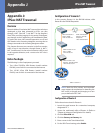
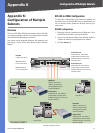
Configuration of Multiple Subnets
4-Port SSL/IPSec VPN Router
Appendix K
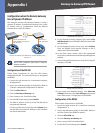
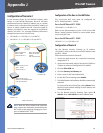
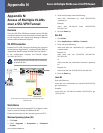
Setup > Network
In the LAN Setting section, select Multiple Subnet.
Click Add/Edit. A new screen appears.
Create a Subnet
In the LAN IP Address field, enter 192.168.7.0.
In the Subnet Mask field, enter 255.255.255.0.
To create the first subnet, click Add to list.
In the LAN IP Address field, enter 192.168.20.0.
In the Subnet Mask field, enter 255.255.255.0.
To create the second subnet, click Add to list.
Click Save Setting.
Click Exit.
On the Network screen, click Save Settings.
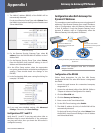
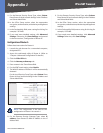
Click the More tab.
Click the Advanced Routing tab.
4.
5.
6.
7.
8.
9.
10.
11.
12.
13.
14.
15.
16.
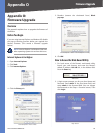
Setup > Advanced Routing
In the Static Routing section, enter 192.168.7.0 in the
Destination IP field.
Enter 255.255.255.0 in the Subnet Mask field.
Enter 192.168.1.2 in the Default Gateway field.
Enter 1 in the Hop Count field.
Select LAN from the Interface drop-down menu.
To create the first static route, click Add to list.
In the Static Routing section, enter 192.168.20.0 in
the Destination IP field.
Enter 255.255.255.0 in the Subnet Mask field.
Enter 192.168.1.20 in the Default Gateway field.
Enter 1 in the Hop Count field.
Select LAN from the Interface drop-down menu.
To create the second static route, click Add to list.
Click Save Settings.
RV042 #1 Configuration
Launch the web browser for a computer connected
one of the Ethernet ports of the RV042 #1.
Access the web-based utility of the RV042 #1. (Refer to
the User Guide of the RV042 for details.)
Click the Setup tab.
Click the More tab.
Click the Advanced Routing tab.
For the Working Mode setting, select Router.
In the Static Routing section, enter 192.168.7.0 in
the Destination IP field.
Enter 255.255.255.0 in the Subnet Mask field.
17.
18.
19.
20.
21.
22.
23.
24.
25.
26.
27.
28.
29.
1.
2.
3.
4.
5.
6.
7.
8.