


94
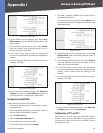
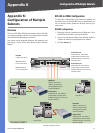
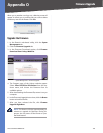
Multiple VLANs with Computers
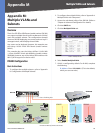
4-Port SSL/IPSec VPN Router
Appendix L
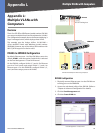
Port 4: Trunking Port
RVL200
192.168.4.x
Default VLAN1
VLAN2 VLAN3 VLAN4
192.168.3.x192.168.2.x
SRW2048
RVL200 with Multiple VLANs Using Computers
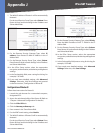
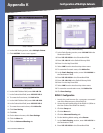
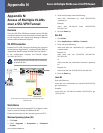
RVL200 Configuration
Physically connect Ethernet port 4 on the RVL200 to a
trunking port on the SRW2048.
Access the web-based utility of the RVL200. (Refer to
“Chapter 4: Advanced Configuration” for details.)
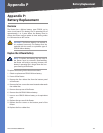
Click the Port Management tab.
Click the Create VLAN tab.
Port Management > Create VLAN
1.
2.
3.
4.
Appendix L:
Multiple VLANs with
Computers
Overview
The 4-Port SSL/IPSec VPN Router (model number: RVL200)
can support multiple Virtual Local Area Networks (VLANs).
The configuration example shows the Router deploying a
Layer 2 managed switch, which deploys three VLANs.
This example uses the Linksys 48-Port 10/100/1000 +
4-Port miniGBIC Switch with WebView (model number:
SRW2048); however, any of the Linksys SRW switches with
802.1Q VLAN support can also be used.
RVL200-to-SRW2048 Configuration
By default, Ethernet ports 1-4 of the RVL200 are set to the
default, VLAN1, when the option, Enable VLAN, is selected
on the Port Management > Create VLAN screen.
On the RVL200, configure VLANs 2, 3, and 4. Set Ethernet
port 4 to Trunk mode, and assign VLANs 2, 3, and 4 to
Ethernet port 4. On the SRW2048, configure VLANs 2, 3,
and 4, and then assign ports to the VLANs.