


Step 16
Click Save Changes.
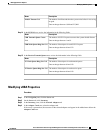
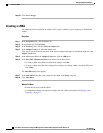
Creating a vHBA
The adapter provides two permanent vHBAs. If NIV mode is enabled, you can create up to 16 additional
vHBAs.
Procedure
Step 1
In the Navigation pane, click the Server tab.
Step 2
On the Server tab, click Inventory.
Step 3
In the Inventory pane, click the Network Adapters tab.
Step 4
In the Adapter Cards area, select the adapter card.
If the server is powered on, the resources of the selected adapter card appear in the tabbed menu below the
Adapter Cards area.
Step 5
In the tabbed menu below the Adapter Cards area, click the vHBAs tab.
Step 6
In the Host Fibre Channel Interfaces area, choose one of these actions:
• To create a vHBA using default configuration settings, click Add.
• To create a vHBA using the same configuration settings as an existing vHBA, select that vHBA and
click Clone.
The Add vHBA dialog box appears.
Step 7
In the Add vHBA dialog box, enter a name for the vHBA in the Name entry box.
Step 8
Click Add vHBA.
What to Do Next
• Reboot the server to create the vHBA.
• If configuration changes are required, configure the new vHBA as described in Modifying vHBA
Properties, on page 11.
Cisco UCS C-Series Servers Integrated Management Controller GUI Configuration Guide, Release 1.4
16 OL-23489-08
Managing Network Adapters
Creating a vHBA