


Setting the IP Address 41
24
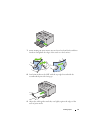
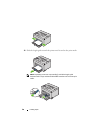
Turn off and turn on the printer.
The Tool Box
NOTE:
NOTE: When you use IPv6 Mode for network printing, the Tool Box cannot be used
to assign an IP address.
1
Click S
tart
All Programs
Dell Printers
Dell 1350cnw Color
Printer
Tool Box
.
NOTE: The Select Printer dialog box opens in this step, when multiple printer
drivers are installed on your computer. In this case, click the name of Dell
1350cnw Color Printer listed in Printer Name, and then click OK.
The
Tool Box
opens.
2
Click the
Printer Maintenance
tab.
3
Select
TCP/IP Settings
from the list at the left side of the page.
The
TCP/IP Settings
page is displayed.
4
Select the mode from
IP Address Mode
, and then enter the values in IP
Address, Subnet Mask, and Gateway Address.
5
Press the
Apply New Settings
button to take effect.
The IP address is assigned to your printer. To verify the setting, open the web
browser on any computer connected to the network and enter the IP address
into the address bar on the browser. If the IP address is set up correctly, the
Dell
Printer Configuration Web Tool
displays in your browser.
You can also assign the IP address to the printer when installing the printer
drivers with installer. When you use the
Network Installation
feature, and the
Get IP Address
is set to
AutoIP
on the operator panel menu, you can set
the IP address from
0.0.0.0
to the desired IP address on the printer selection
window.
Verifying the IP Settings
1
Print the printer settings page.
See "Printing and Checking the Printer Settings Page" on page 42.