


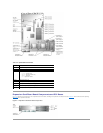
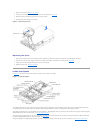

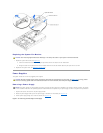


Replacing the Control Panel
1. Lower the control-panel assembly into the system.
2. Connect the control-panel cable to the control panel board (see Figure4-7).
3. Align the assembly with the posts on the front panel (see Figure4-7).
4. Replace the screws that secure the control-panel assembly in the system (see Figure4-7).
l Two screws at the top of the control-panel assembly that secures the assembly to the front panel.
l One screw at the bottom of the control-panel that secures the assembly to the bottom of the chassis.
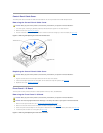
5. Replace the front-panel I/O board (see "Replacing the Front-Panel I/O Board").
6. Replace the control-panel cable cover (see "Replacing the Control-Panel Cable Cover").
System Fans
The system includes the following hot-pluggable cooling fans:
l Two system fans
l One expansion-card fan
l One microprocessor fan for each installed microprocessor
The system may also include other optional hot-pluggable fans.
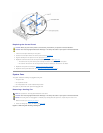
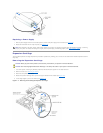
Removing a Cooling Fan
1. Remove the cover (see "Removing the Cover").
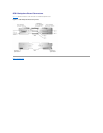
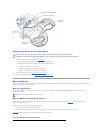
2. Pull the fan straight up to clear the chassis (see Figure4-8).
Figure 4-8. Removing and Installing a Cooling Fan
CAUTION: Before you perform this procedure, read the safety instructions in your System Information document.
CAUTION: See "Protecting Against Electrostatic Discharge" in the safety instructions in your System Information document.
NOTE: The procedure for removing each individual fan is the same.
CAUTION: See "Protecting Against Electrostatic Discharge" in the safety instructions in your System Information document.
NOTICE: The cooling fans are hot-pluggable. To maintain proper cooling while the system is on, replace only one fan at a time.