


1. Remove the bezel (see "Removing the Bezel").
2. Turn off the system, including any attached peripherals, and disconnect all the power cables from electrical outlets.
3. Remove the cover (see "Removing the Cover").
4. Verify that the memory modules, expansion cards, and microprocessors are fully seated in their sockets or connectors.
l To remove and reseat microprocessors, perform the steps described in "Microprocessors."
l To remove and reseat a memory module, perform the steps described in "Memory Modules."
l To remove and reseat an expansion card, perform the steps described in "Expansion Cards."
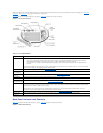
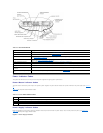
5. Verify that all jumpers are set correctly (see Figure5-2).
6. Check all cable connectors inside the system to verify that they are firmly attached to their appropriate connectors.
7. Replace the cover (see "Replacing the Cover").
8. Reconnect the system and any attached peripherals to their power sources, and turn them on.
Does the problem appear to be resolved?
Yes. No further steps are necessary
No. Proceed to "Obtaining Technical Assistance."
Running the System Diagnostics
You can run system diagnostics from either the utility partition on your hard drive or from a set of diskettes that you create from the Dell OpenManage Server
AssistantCD.
To run the diagnostics from the utility partition, perform the following steps:
1. Start the utility partition by pressing <F10> during POST.
2. From the utility partition's main menu, select the Run System Diagnostics option from Run System Utilities.
See "Using the Dell OpenManage Server Assistant CD" in the User's Guide for additional information about the utility partition.
To run the system diagnostics from the diskettes, perform the following steps:
1. Create a set of diagnostics diskettes using the Dell OpenManage Server Assistant CD.
See "Using the Dell OpenManage Server Assistant CD" in the User's Guide for information on creating diskettes.
2. Boot the system from the first diagnostics diskette.
If the system fails to boot, see "Obtaining Technical Assistance."
When you start the diagnostics, a message is displayed telling you that the diagnostics is loading. The Diagnostics menu appears. The menu allows you to
run all or specific diagnostic tests or to exit system diagnostics.
For a quick check of the system, select Test All Devices and then select Quick Tests. This option runs only the device tests that do not require user
interaction and that do not take a long time to run. Dell recommends that you choose this option first to increase the chance of tracing the source of the
problem quickly. To test a particular device, select Test One Device. For a complete check of the system, select Test All Devices and then select Extended
Tests.
To check a particular area of the system, choose Advanced Testing. When you select Advanced Testing, the main screen of the diagnostics appears. This
screen includes a listing of the various device groups in the system and the system's service tag.
To view data on test results, select Information and Results. Select Program Options to view the program options screen, which lets you set various test
parameters.
By selecting the Device Configuration option, you can see an overview of the devices in the system.
Selecting Exit to MS-DOS exits the diagnostics and returns you to the MS-DOS®operating system environment.
To select an option from the Diagnostics menu, highlight the option and press <Enter>, or press the key that corresponds to the highlighted letter in the
option you choose.
Obtaining Technical Assistance
If at any time you do not understand a procedure described in this guide or if your system does not perform as expected, there are a number of tools are
CAUTION: The microprocessor and heat-sink assembly can get extremely hot during system operations. Be sure that it has had sufficient time to
cool before touching it.
CAUTION: When handling the microprocessor and heat-sink assembly, take care to avoid sharp edges on the heat sink.
NOTE: Before you read the rest of this section, start the system diagnostics so that you can see it on your monitor screen.