


c. Press the cable securing latch into the locked position.
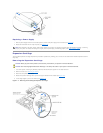
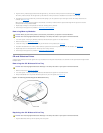
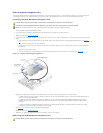
3. Install the CD drive on the drive tray (see Figure4-16):
a. Lower the left side of the drive to the tray with the tray's pins aligned with the drive's holes.
b. Lower the right side of the drive onto the tray.
4. Replace the drive tray brace by aligning the end of the brace with the notch on the tray, and then tighten the brace's thumbscrew (see Figure4-16).
5. Connect the cable to the CD drive by pressing the cable connector to the drive connector.
6. Replace the CD/diskette drive tray (see "Replacing the CD/Diskette Drive Tray").
Removing the CD/Diskette Drive Cable
1. Remove the CD/diskette drive tray (see "Removing the CD/Diskette Drive Tray").
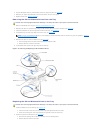
2. If you did not remove the CD and diskette drives from the tray, disconnect the cable from the drives (see Figure4-16):
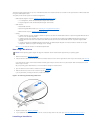
a. Disconnect the cable from the CD drive by pulling the cable connector away from the drive.
b. Disconnect the cable from the diskette drive by pulling the securing latch on the drive's connector upward to release the cable, and then sliding
the cable out of the drive's connector.
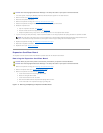
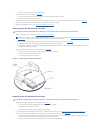
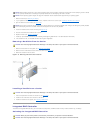
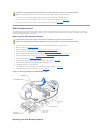
3. Remove the drive cable assembly from the tray bracket (see Figure4-17):
a. Remove the two rivets that secure the cable assembly board to the tray bracket.
b. Remove the two rivet collars from the board.
c. Lift the board away from the tray bracket.
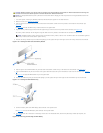
Figure 4-17. Removing the CD/Diskette Drive Cable
Replacing the CD/Diskette Drive Cable
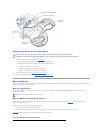
1. Replace the drive cable assembly on the tray bracket (see Figure4-17):
a. Align the holes in the cable assembly board with the holes in the tray bracket.
b. Replace the two rivet collars in the board.
c. Replace the two rivets that secure the board to the tray bracket.
2. If you removed the CD and diskette drives from the tray, replace the drives on the tray (see "Replacing the CD and Diskette Drives on the Tray").
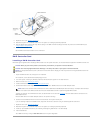
3. If you did not remove the CD and diskette drives from the tray, connect the cable to the drives (see Figure4-16):
a. Connect the cable to the diskette drive by raising the securing latch on the drive's connector to the released position, sliding the cable into the
drive's connector, and pressing the cable securing latch into the locked position.
b. Connect the cable to the CD drive by pressing the cable connector to the drive connector.
CAUTION: See "Protecting Against Electrostatic Discharge" in the safety instructions in your System Information document.
NOTE: You do not have to remove the CD and diskette drives from the tray to remove the drive cable (see "Removing the CD and Diskette Drives
From the Tray"). However, you must disconnect the cable from the drives to replace the cable.
CAUTION: See "Protecting Against Electrostatic Discharge" in the safety instructions in your System Information document.