


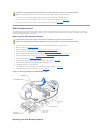
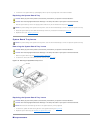

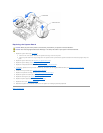

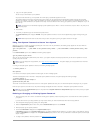

4. Remove the system battery (see Figure4-30). See Figure5-3 to locate the system battery on the system board.
You can pry the system battery out of its connector with your fingers or with a blunt, nonconductive object such as a plastic screwdriver.
5. Install the new system battery with the side labeled "+" facing up (see Figure4-30).
Figure 4-30. Removing and Installing the System Battery
6. Replace the expansion-card cage (see "Replacing the Expansion-Card Cage").
7. Replace the cover (see "Replacing the Cover").
8. Reconnect the system to its electrical outlet and turn the system on, including any attached peripherals.
9. Enter the System Setup program to confirm that the battery is operating properly (see "Using the System Setup Program").
10. Enter the correct time and date in the System Setup program's Time and Date fields.
11. Exit the System Setup program.
12. To test the newly installed battery, turn off the system and disconnect it from the electrical outlet for at least an hour.
13. After an hour, reconnect the system to its electrical outlet and turn it on.
14. Enter the System Setup program and if the time and date are still incorrect, see "Obtaining Technical Assistance."
System Board
Removing the System Board
1. Turn off the system, including any attached peripherals, and disconnect the system from the electrical outlet.
2. Remove the cover (see "Removing the Cover").
3. Remove the power supplies (see "Removing a Power Supply").
4. Remove the cooling fans (see "Removing a Cooling Fan").
5. Remove the system fan bracket (see "Removing the System-Fan Bracket").
6. Remove the expansion-card cage (see "Removing the Expansion-Card Cage").
7. Remove the memory modules (see "Removing Memory Modules").
8. Remove the memory module, hardware key, and battery for the integrated RAID controller (if those components are installed) (see "Activating the
Integrated RAID Controller").
9. Remove the microprocessors and VRMs (see "Adding or Replacing a Microprocessor").
10. Remove the system battery (see "Replacing the System Battery").
11. Remove the system board tray (see "Removing the System Board Tray").
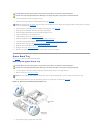
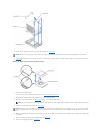
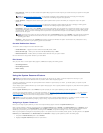
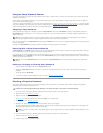
12. Remove the system board (see Figure4-31):
a. Liftthesystemboard'splungerandslidethesystemboardforwardabout0.5inch.
b. Lift the system board off its grounding tabs in the system board tray.
c. Lift the back of the system board upward and then lift the board away from the tray.
Figure 4-31. Removing the System Board
CAUTION: Before you perform this procedure, read the safety instructions in your System Information document.
CAUTION: See "Protecting Against Electrostatic Discharge" in the safety instructions in your System Information document.