


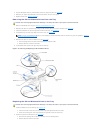

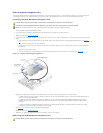
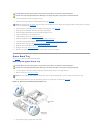

The hard-drive bays provide space for up to five 1-inch SCSI hard drives. The hard drives connect to a controller on the system board or a RAID controller card
through the SCSI backplane board.
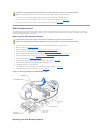
The system provides several options for hard drive configurations:
l SCSI backplane daughter card (see "Installing the SCSI Backplane Daughter Card"):
¡ 1x5configuration,withouttheSCSIbackplanedaughtercardinstalled
¡ 2/3 split configuration, with the SCSI backplane daughter card installed
l SCSI controller:
¡ Onboard SCSI controller
¡ Optional integrated RAID controller (see "Activating the Integrated RAID Controller")
¡ RAID controller card (see "Installing a RAID Controller Card")
l Cabling:
¡ If a RAID controller card is not installed, no cables are required to use either the onboard SCSI controller or optional integrated RAID controller in
eithera1x5or2/3splitconfiguration.
¡ If a RAID controller card is installed, cables can be connected from the controller card to SCSIA and/or SCSIB backplane board connector(s). A
backplane board connector that is not attached to the RAID controller card will use the onboard SCSI controller or optional integrated RAID
controller.
¡ If a cable is connected to the SCSIB backplane board connector, the SCSI backplane daughter card must be installed to activate the 2/3 split
configuration. Otherwise, the system will display an error message.
See Figure5-5 to locate the connectors on the SCSI backplane board.
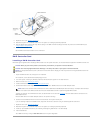
Removing a Hard Drive
1. Remove the bezel (see "Removing the Bezel").
2. Take the hard drive offline and wait until the hard-drive indicator codes on the drive carrier signal that the drive may be removed safely (see Table3-6).
If the drive has been online, the drive status indicator will blink green twice per second as the drive is powered down. When all indicators are off, the
drive is ready for removal.
See your operating system documentation for more information on taking the hard drive offline.
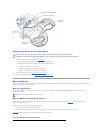
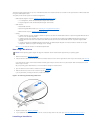
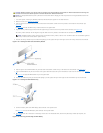
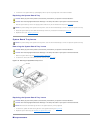
3. Open the hard-drive carrier handle to release the drive (see Figure4-18).
4. Slide the hard drive out until it is free of the drive bay (see Figure4-18).
If you are permanently removing the hard drive, install a blank insert.
Figure 4-18. Removing and Installing a Hard-Drive
5. Replace the bezel (see "Replacing the Bezel").
6. If your replacement hard drive does not have a carrier, remove the faulty drive from its carrier (see "Removing a Hard Drive From Its Carrier").
Installing a Hard Drive
NOTICE: Not all operating systems support hot-plug drive installation. See the documentation supplied with your operating system.