


11 Installation
• Port Expansion Module (PEM)
NOTE: A virtual media session cannot be opened to a server that is connected to a
PEM.
Setting Up Your Network
The Remote Console Switch system uses IP addresses to uniquely identify
the Remote Console Switch units and the computers running Remote
Console Switch Software. The Remote Console Switch supports DHCP and
static IP addressing. (If you are connecting your remote software to the
previous 2161DS, you will need to use BootP instead of DHCP).
Keyboards
USB or PS/2 type keyboards may be connected to the Analog Port of the
Remote Console Switch.
NOTE: The Remote Console Switch also supports the use of multiple keyboards
and multiple mice on the Analog Port. The use of more than one input device
simultaneously, however, may produce unpredictable results.
Rack Mounting Your Remote Console Switch Unit
Obtain a Switch Mounting Bracket Kit (0U or 1U) to rack-mount your
Remote Console Switch unit. Before installing the Remote Console Switch
and other components in the rack, stabilize the rack in a permanent location.
Start rack mounting your equipment at the bottom of the rack, then work to
the top. Avoid uneven loading or overloading of racks.
CAUTION: Before installing systems in a rack, install front and side stabilizers on
stand-alone racks or the front stabilizer on racks joined to other racks. Failure to
install stabilizers accordingly before installing systems in a rack could cause the
rack to tip over, potentially resulting in bodily injury under certain circumstances.
Therefore, always install the stabilizer(s) before installing components in the rack.
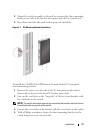
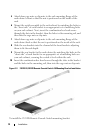
To install the 0U switch mounting bracket (shipped as default):
1 Line up the holes of the mounting brackets with the screw holes in the
switch.
2 Fasten the mounting bracket to the switch using the button head socket
cap screws on each side.