


Installation 32
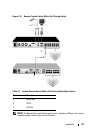
Connecting to the Network
To connect the network and power up your Remote Console Switch:
1 Connect your network cable to the LAN port on the rear of the Remote
Console Switch to your network.
NOTE: If you are using a 2321DS Remote Console Switch, you will have two
redundant LAN ports. If the first LAN port fails, the second one will take over.
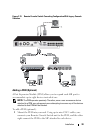
2 Power up all attached systems in any order.
3 Attach your monitor and keyboard and mouse cable connectors to the
appropriate ports on the back of your Remote Console Switch unit.
On-board Web Interface Installation and Setup
Once you have installed a new Remote Console Switch, you can use the on-
board web interface to configure unit parameters and launch video sessions.
Supported Browsers
The on-board web interface supports the following browsers:
• Microsoft Internet Explorer
®
version 6.x SP1 or later
• Firefox version 2.0 or later
Launching the On-board Web Interface
To launch the on-board web interface:
1
Open a web browser and type the IP address of the Remote Console
Switch. You can set the IP address of the switch using OSCAR or the serial
port; see "Controlling Your System at the Analog Ports" on page 36 for
more information.
2
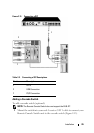
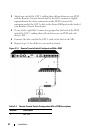
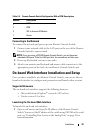
CAT 5e
3
PEM
4
SIP or Avocent IQ Module
5
Server
Table 2-4. Remote Console Switch Configuration With a PEM Descriptions
Number Description