


70 Installing System Components
5
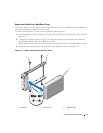
To remove the diskette drive filler plate, pull the retention spring slightly away from the filler plate,
then lift the filler plate from the carrier.
6
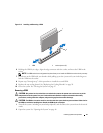
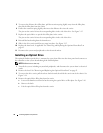
Deflect the retention spring slightly, then insert the diskette drive into the carrier.
The pins on the carrier fit into the corresponding holes in the side of the drive. See Figure 3-15.
7
Replace the optical drive or optical drive filler plate in the carrier.
The pins on the carrier fit into the corresponding holes in the side of the drive.
8
Reinstall the latch and tighten the thumbscrew.
9
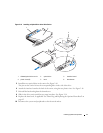
Slide in the drive carrier until the tray snaps into place. See
Figure 3-15
10
Replace the front bezel, if applicable. See "Removing and Replacing the Optional Front Bezel" on
page 45.
11
Reconnect the system and peripherals to their electrical outlets.
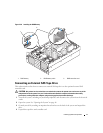
Installing an Optical Drive
The optional slimline optical drive is mounted on a tray that slides into the front panel and connects to
the controller on the system board through the SAS backplane.
NOTE: DVD devices are data only.
1
Turn off the system, including any attached peripherals, and disconnect the system from its electrical
outlet.
2
Remove the bezel. See "Removing and Replacing the Optional Front Bezel" on page 45.
3
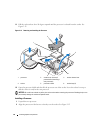
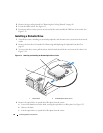
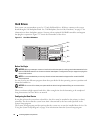
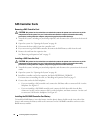
To remove the drive carrier, pull the release latch forward, then slide the carrier out of the chassis. See
Figure 3-14
.
4
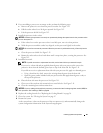
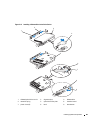
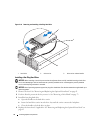
Remove the optical drive filler plate from the carrier:
a
Loosen the thumbscrew from the latch securing the optical drive or filler plate. See Figure 3-16.
b
Remove the latch.
c
Lift the optical drive filler plate from the carrier.