


Maintenance 77
25A Switch Mode RectifierNT5C06B / C Installation and User Manual
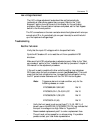
Procedure 21 - Fan replacement ( continued )
Step Action
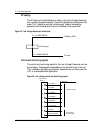
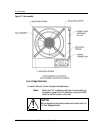
4 Remove the four retaining screws which hold the chassis plate, fan and
fan grill together (see Figure 27).
5 Place the mounting clips on the replacement fan (if it is not so equipped).
6 Mount the replacement fan in the same orientation as the old one,
ensuring the wire is connected to the fan in the same manner. Ensure the
orientation of the fins is such that the air is blown outwards when the fan
is operated.
7 Secure the fan, fan grill and chassis plate with the four retaining screws.
8 Reconnect the fan connector and mount the fan assembly in the unit with
the five mounting screws
9 Plug the unit back in and power it up. Holding a piece of paper at the front
the unit will confirm that the air is pulled inwards from the front.
10 Listen carefully for any noise from the fan. It should run free. Verify that
the fan alarm is OFF.
–end–
CAUTION
Verify and ensure that the fan spins freely, without
interference
.
CAUTION
Do not run the rectifier without a fully operational fan or
with a fan other than the specified replacement for this
cooling application
.