


Installation Overview
Listed below are the general steps you follow to install options,
connect peripheral devices, and configure your system. For
detailed instructions on performing these steps, see the
appropriate sections specified in the overview.
1.
Install any optional equipment you want to add to your
computer, such as disk drives, a math coprocessor, memory
modules, or EISA option cards. Do not install any ISA
option cards yet (unless you will be using an ISA card to
control your monitor). See “Installing Optional Equipment”
below.
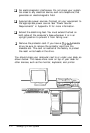
2.
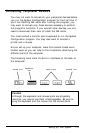
Connect a monitor, a printer, the keyboard, and a mouse, if
you are going to use one. See “Connecting Peripheral
Devices” below.
3.
Then see “Turning On Your Computer,” below, before you
turn on the system.
4.
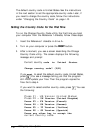
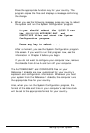
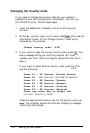
Run the Change Country Code utility (CHGCTR) to install
the correct keyboard driver and configuration information
for your system. See “Running the Change Country Code
Utility,” below, for instructions.
5.
Read “The Configuration Process” in Chapter 2 to familiarize
yourself with the use of the System Configuration program.
6.
Run the System Configuration program, as described in
Chapter 2, to configure your system.
7.
Turn off the system, unplug all the power cords, and
disconnect any peripheral devices from the computer.
8.
Set any switches or jumpers on your ISA cards, if necessary,
and install them in the computer. See Chapter 5 for
instructions on installing option cards.
Setting Up Your System
1-3