


Installing Modules and Establishing Initial Management Access
BlackDiamond 8800 Series Switches Hardware Installation Guide
102
NOTE
The following slots will only operate an MSM: Slot 5/A in the BlackDiamond 8810 chassis; slot 3/A in the
BlackDiamond 8806 chassis.
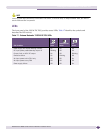
MSMs reside in different slots depending on which BlackDiamond switch you operate:
● If you are using only one MSM in the BlackDiamond 8806 switch, install that MSM in slot 3. If you
add a second MSM to increase reliability and throughput, install the second MSM in slot 4.
● If you are using only one MSM in the BlackDiamond 8810 switch, install that MSM in slot 5. If you
add a second MSM to increase reliability and throughput, install the second MSM in slot 6.
Distinguishing an MSM from an I/O Module
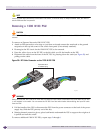
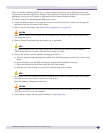
One quick way to distinguish a BlackDiamond 8800 series MSM from an I/O module is by the color of
the release latch on each injector/ejector handle. Orange injector/ejector release latches indicate that the
module is a BlackDiamond MSM, and green injector/ejector release latches indicate that the module is a
BlackDiamond I/O module (see Figure 57).
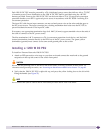
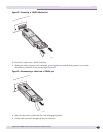
Figure 57: Colors on Injector/ejector Release Latches
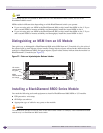
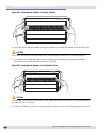
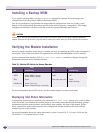
Installing a BlackDiamond 8800 Series Module
You need the following tools and equipment to install a BlackDiamond 8800 MSM or I/O module:
● ESD-preventive wrist strap
● #2 Phillips screwdriver
● Appropriate type of cable for any ports on the module
CAUTION
The module series number must be the same as the switch series number. For example, install BlackDiamond 8800
modules only in a BlackDiamond 8800 series switch.
EX_122
I/O module
release latches
are green
MSM
release latches
are orange