


Installing Power Supply Units in the BlackDiamond 8800 Series Switches
BlackDiamond 8800 Series Switches Hardware Installation Guide
98
NOTE
Leave the ESD strap permanently connected to the switch, so that the strap is always available when you need to
handle ESD-sensitive components.
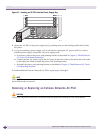
Removing a 1200 W DC PSU
CAUTION
The 1200 W DC PSU may be hot to the touch; use thermal protective gloves to handle the 1200 W DC PSU during
removal.
To remove an Extreme Networks 1200 W DC PSU:
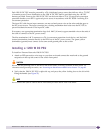
1 Attach an ESD-preventive wrist strap to your bare wrist and connect the metal end to the ground
receptacle on the top-left corner of the switch front panel (if not already attached).
2 De-energize the DC circuit for the 1200 W DC PSU to be removed.
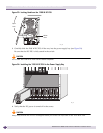
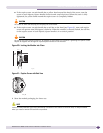
3 Press the yellow lever on the DC PSU to the left while you lift the handle on the PSU.
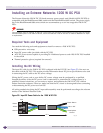
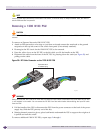
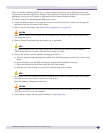
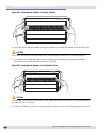
4 Disconnect the cable from the front of the DC PSU by pressing down the catch (see Figure 56) and
pulling out the cable.
Figure 56: DC Cable Connector on the 1200 W DC PSU
WARNING!
Always be sure that the 1200 W DC PSU does not have the input cabled connected at any time when the DC PSU
is not installed in the switch. Do not remove the DC PSU from the switch before disconnecting the input DC cable
from the PSU.
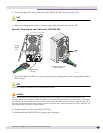
5 Pull the handle of the PSU to disconnect the PSU from the power connector at the back of the power
supply bay. Slide the PSU partway out of the bay.
6 Wearing thermal protective gloves, place both hands underneath the PSU to support the weight as it
is pulled out from the switch.
To remove additional 1200 W DC PSUs, repeat steps 2 through 6.
EX_133
Squeeze catch
to release plug