


Installing the BlackDiamond 8800 Series Chassis
BlackDiamond 8800 Series Switches Hardware Installation Guide
78
NOTE
Save all packaging, bolts, washers, and clip locks, as well as the box and pallet, for future use in the event that the
chassis must be moved to another location or returned to Extreme Networks.
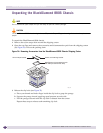
Verify that the following items are included in the shipping carton:
● BlackDiamond 8810 chassis with eight installed blank front panels
● Power cord retaining bracket
● 19-inch helper bracket (installation tray)
● BlackDiamond documentation pack with ESD-preventive wrist strap
NOTE
Save all packaging, clip locks, and box pieces for future use in the event that the BlackDiamond 8810 chassis must
be moved to another location or returned to Extreme Networks, Inc.
Pre-installation Requirements
The following tools, equipment, and resources are required for installing the BlackDiamond 8800 series
chassis:
● ESD-preventive wrist strap (provided)
● 19-inch helper bracket (provided)
● For installing the chassis in a mid-mount position in the rack:
■ Optional BlackDiamond 8806/12804 mid-mount kit, part number 65046. Order this kit separately
from the chassis.
or
■ Optional BlackDiamond 8810 mid-mount kit, Model 41141. Order this kit separately from the
chassis.
■ #2 Phillips screwdriver
● Rack-mount screws appropriate for your organization’s rack system, as follows:
■ 4 screws to attach the helper bracket
■ 12 screws to secure the chassis in the rack
The screw size will vary based on your organization’s rack system; screws are not provided.
● Screwdriver appropriate for the rack-mounting screws you will use
The screwdriver size will vary based on the requirements of your organization’s rack system.
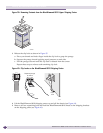
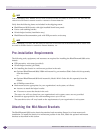
Attaching the Mid-Mount Brackets
The BlackDiamond 8800 series chassis has attached rack-mounting flanges for a front-mount rack
installation. To install the chassis in a mid-mount position in the rack, attach the optional mid-mount
brackets as described in this section.