


SW2 DP • Operation 14
14
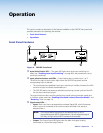
NOTES: • The SW2 DP is fully HDCP compliant. The source negotiates with the SW2 DP
input and the display negotiates with the SW2 DP output.
• The SW2 DP does not support DisplayPort Content Protection (DPCP).
• The SW2 DP assigns identical EDIDs to the inputs.
EDID information is read from the display device connected to the output. The learned
EDID is stored in memory and is retained after a power cycle or after a new display device is
connected to the output. A reset to factory values returns the EDID to the default.
The new EDID is then available when DIP switch 1 is in the Stored (down) position. Each time
a new EDID is recorded, it overwrites the existing data and is available when DIP switch 1 in
the Stored position.
Storing the display EDID
1. Connect the display device that will provide EDID information to the output.
2. Power on the display and the SW2 DP.
3. Set DIP switch 1 in the Stored (down) position (see “EDID Minder DIP Switch
settings” for more information about setting the DIP switches).
4. Using a stylus or small Philips screwdriver, press the recessed EDID Store button.
The EDID Minder LED lights amber, then changes to green when the recording process is
successfully completed.
Changing the stored EDID
To replace the stored EDID with that of a different display, connect the new display to the
output, then repeat steps 2 through 4 of the “Storing the display EDID” procedure
described above.
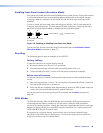
EDID Minder DIP switch settings
The EDID Minder DIP switch (DIP switch 1, on the left) selects the EDID value that is presented to
the source device:
• In the Default (up) position, the EDID value is the factory-stored default, with a
resolution of 1920x1080 @ 60 Hz with 2-channel audio.
• In the Stored (down) position, the most recently recorded EDID value is used (this file
overwrites previously stored values). Before any other EDID file is recorded, this is also
the factory default resolution of 1920x1080 @ 60 Hz with 2-channel audio.
When the DIP switch is in this position, press the EDID button to initiate EDID storing.
NOTE: DIP switch 2, on the right, is not used.
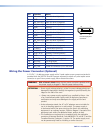
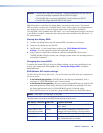
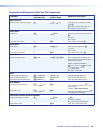
The table below summarizes the EDID Minder settings and functions.
DIP Switch 1 Position LED Color Function Indicated
Stored (down) Red EDID storing is enabled, but the default EDID is
still in effect.
Stored (down); EDID
Store button pressed
Amber EDID storing is enabled and the EDID of the
currently connected display is being recorded.
Stored (down) Green An EDID other than the default has been stored.
Default (up) Off The factory default EDID of 1920x1080 @ 60 Hz
with 2-channel audio is in effect.