


SW2 DP • Installation 33
Installation
This section gives an overview of the steps to install the SW2 DP switcher and detailed
instructions for cabling. It also provides a description of the rear panel connectors. The
following topics are covered:
• Installation Overview
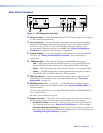
• Rear Panel Features
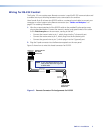
• Wiring for RS-232 Control
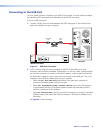
• Connecting to the USB Port
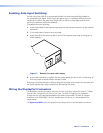
• Enabling Auto-input Switching
• Wiring the DisplayPort Connectors
• Wiring the Power Connector (Optional)
Installation Overview
To install and set up the SW2 DP switcher:
1. Turn off all of the equipment and disconnect it from the power source.
2. (Optional) Mount the switcher on a rack shelf or furniture (see “Mounting the SW2 DP
Switcher” on page 27).
3. Connect DisplayPort input sources to one or both SW2 DP input connectors.
4. Connect a DisplayPort output device to the switcher output connector.
5. Connect your computer to one of the following control ports to configure and control
the switcher via SIS commands:
• RS-232 port — Pins 1, 2, and 3 of the Remote port for Serial RS-232 control (See
“Wiring for RS-232 Control” on page 5 for connection procedures.)
• Config port — USB mini-B connector for USB control (See “Connecting to the
USB Port” on page 6 for connection procedures.)
6. (Optional) To enable auto-input switching, use a jumper to short pins 4 and 5 of the
Remote connector together (see “Enabling Auto-input Switching”on page 8).
7. If necessary, wire a 2-pole captive screw connector to your external power supply (see
“Wiring the Power Connector [Optional]”on page 9).
8. Power on the output device.
9. Connect power to the switcher.
10. Power on the input devices.