


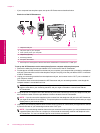
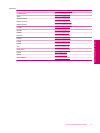

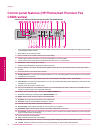

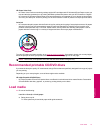

Control panel features
Control panel features
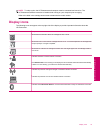
#
0
*
9 wxyz
8 tuv
7 pqrs
6 mno5 jkl
4 ghi
3 def
2 abc
1
DCD/DV
OK
1 Color graphics display (also referred to as the display): Displays menus, photos, and messages. The display can be pulled
up and angled for better viewing.
2 Back: Returns to the previous screen.
3 Menu: Presents a set of options related to the current display.
4 Attention light: Indicates a problem occurred. See the display for more information.
5 Home: Returns to the Home screen (the default screen when you turn on the product).
6 OK: Selects a menu setting, value, or photo.
7 Directional pad: Navigates through photos and menu options.
8 Zoom In: Zooms in on a photo. Use this button together with the arrows on the directional pad to crop the photo before
printing.
9 Zoom Out: Zooms out to show more of a photo.
10 Red-Eye Removal: Turns the Red-eye Removal feature on or off. The setting applies to all the photos in the print queue.
11 Photo Reprints: Makes a copy of an original photo placed on the glass.
12 Quick Forms: Prints a variety of blank forms, such as school paper, music paper, mazes, and checklists.
13 Auto Answer: Turns the Auto Answer feature on or off. The recommended setting varies depending on the services and
equipment on your phone line.
14 Keypad: Enters fax numbers, values, or text.
15 On: Turns the product on or off. When the product is off, a minimal amount of power is still used. To completely remove
power, turn off the product, then unplug the power cord.
16 Wireless network indicator light: Indicates that the Wireless Radio is on.
17 Bluetooth indicator light: Indicates that the Bluetooth Radio is on.
18 Space: Enters spaces and pound signs for fax-related tasks.
19 Symbols: Enters symbols and asterisks for fax-related tasks.
20 Start Fax: Sends or receives a black-and-white or color fax.
21 CD/DVD access door handle: Lowers the CD/DVD tray.
22 Start Copy: Starts a black-and-white or color copy.
23 Start Scan: Opens the Scan Menu where you can select a destination for your scan.
24 Print Photos: Prints the photos selected on your memory card. If no photos are currently selected, the product prints the
photo currently showing on the display.
25 Cancel: Stops the current operation.
26 Help: Provides help about the current display.
27 Setup: Opens the Setup menu where you can change product settings and perform maintenance functions.
28 2-Sided: Opens the 2-sided menu where you can change settings to make 2-sided copies and faxes.
Control panel features 31
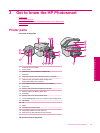
Get to know the HP Photosmart