


1
2
3
4
X
Y
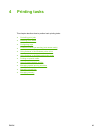
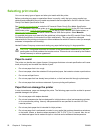
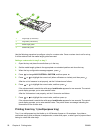
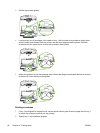
1 Page length (Y dimension)
2 Page width (X dimension)
3 Media length guides
4 Media width guides
Use the following procedure to configure a tray for a custom size. Once a custom size is set for a tray,
it will be retained until the media length guides are reset.
Setting a custom size in tray 2 or tray 3
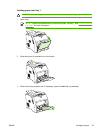
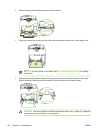
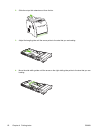
1. Open the tray and place the media face-up in the tray.
2. Set the media length guides to the appropriate non-standard position and close the tray.
3. When the tray configuration message appears, press
.
4. Press
to change ANY CUSTOM to CUSTOM, and then press .
5. Press
or to highlight the correct unit (either millimeters or inches), and then press .
After the unit of measure is set properly, set the X dimension as follows:
6. Press
or to highlight the correct value, and then press .
If the value entered is outside the valid range, Invalid value appears for two seconds. The control-
panel display prompts you to enter another value.
After the X dimension is set properly, set the Y dimension as follows:
7. Press
or to highlight the correct value, and then press .
If the value entered is outside the valid range, Invalid value appears for two seconds. The control-
panel display prompts you to enter another value. The printer shows a message indicating the
dimensions for the custom size.
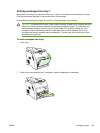
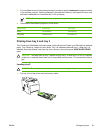
Printing from tray 1 (multipurpose tray)
Tray 1 is a multipurpose tray that holds up to 100 sheets of paper or 10 envelopes. It provides a
convenient way to print envelopes, transparencies, custom-size paper, or other types of paper without
having to unload the other trays.
56 Chapter 4 Printing tasks ENWW