


Chapter 2 System Information
22
l Maximum configuration is 8 GB.
l Do not rock the DIMM into place, but apply firm and even pressure until it is seated in the
socket.
l Use only HP-supported DIMMs.
The installation procedure is the same for the rack-mount and the pedestal HP NetServers once you gain
access to the system board assembly. While you can perform memory installation in the rack or in the
pedestal, it is recommended that you remove the system board assembly in order to install components. If
you install memory without removing the system board assembly, the DIMM slots region of the system board
is accessible when the bottom cover of the LH 6000r is removed and the left cover of the LH 6000 is
removed.
CAUTION Wear a wrist-strap and use a static-dissipating work surface connected to the
chassis when handling components. Ensure the metal of the wrist strap contacts
your skin.
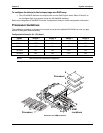
Mass Storage Guidelines
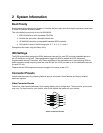
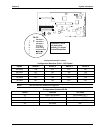
This HP NetServer has a flexible mass storage system. You can install up to six hot-swap devices in the
primary hot-swap mass storage cage and you can install an additional six hot-swap devices in the optional,
secondary cage.
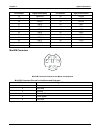
Non-hot-swap
drive shelves
Secondary
hot- swap
cage
Primary
hot-swap
cage
CD-ROM
drive
Flexible
disk drive
The mass storage system includes several standard pre-installed devices:
• A flexible disk drive is installed in Shelf 1.
• An IDE CD-ROM drive is installed in Shelf 2.
• A single hot-swap Ultra-2 SCSI hard disk drive is installed in the primary hot-swap mass storage
cage.
The HP NetServers support two classes of mass storage devices: