


HP OmniBook 2100/3000/3100 Removal and Replacement 2-27
Reassembly Notes
Note: Installing a New Motherboard
• Caution: Replace the motherboard with one containing a BIOS IC that is compatible with the
CPU module—see the table starting on page 4-3. Alternatively, reuse the BIOS IC from the
original motherboard.
• Transfer these PCAs from the old motherboard to the new one:
LVDS PCA (secure it with one 5 mm screw on the right side).
Caution: Do not use a longer screw—it will damage the motherboard.
Audio PCA (on the underside).
RAM board, if present (on the underside).
• Reprogram the BIOS IC—see the note below.
• Store the serial number electronically in the new motherboard—see the steps below.
Note: Installing a New Bottom Case
• Transfer these parts from the old bottom case to the new one:
Plastic parts (I/O door, RAM cover).
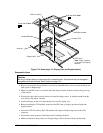
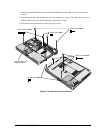
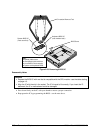
Lock plate and IR lens, if not included with new case (see Figure 2-21).
• Install new regulatory and serial-number labels on the bottom case—see the steps below.
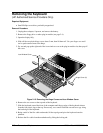
• Check that the audio PCA has two rubber bumpers attached to the board directly behind the two
connectors.
• Check that the audio PCA is securely attached to the underside of the motherboard before
installing the motherboard. The audio PCA can work loose if you flex the motherboard
excessively.
• Place the audio jack cover onto the audio jacks before you lower the motherboard into the case.
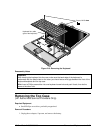
• Raise the front edge of the motherboard only high enough for the PCMCIA pushbuttons to clear
the bottom case. Work the I/O bracket into the back of the bottom case, then lower the front edge
into the case.
• Do not install screws into the motherboard next to the ac adapter socket or next to the plug-in
module socket. (See Figure 2-21.)
Caution
When installing the CPU module onto the motherboard, press it down above the connectors—but
do not push on large components. Otherwise, you could damage pressure-sensitive components
on the module.
• The two screws at the front-underside of the bottom case are the shortest screws—only 3 mm
long.
Caution
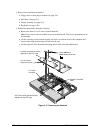
Insert the back end of the USB PCA into the case first, then carefully align the connector before
pressing it onto the motherboard. Take care not to damage the connector pins.