


2-28 Removal and Replacement HP OmniBook 2100/3000/3100
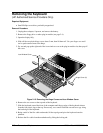
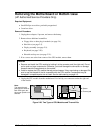
• Before you install the top case and heatsink, check the screw holes at the front corners of the CPU
module:
If two screws were previously installed, install them again. (You install the back-left screw
after you install the heatsink.)
If no screws were installed in the front corners of the CPU module, do not install screws
there—the heatsink holds the CPU module. (You install the back-left screw after you install
the heatsink.)
Note
If you installed a new motherboard with a new BIOS IC, the IC contains only enough basic
programming to boot the OmniBook. After installing the IC, you must reprogram it. Hewlett-
Packard prefers that you program the IC with the latest BIOS—follow the directions carefully. You
can download it from the OmniBook website (see page vi).
Storing the Serial Number Electronically
1. Exit Windows and boot to a DOS prompt.
2. Run ESN.EXE from one of these sources:
On a factory software installation, change to the \OmniBook\Drivers\Hputils directory
(OmniBook 2100/3100) or \Omnibook directory (OmniBook 3000) and type
esn at the
prompt.
Otherwise, copy \Omnibook\Drivers\Hputils\Esn.exe from the OmniBook Recovery CD, then
run it on the OmniBook.
3. Store the serial number:
If you are prompted for the serial number, type the serial number shown on the bottom of the
case.
If a serial number has already been stored, you must call an HP support center to change it.
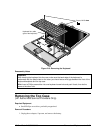
Installing New Regulatory and Serial-Number Labels — OmniBook 2100/3100
If you do not have a master template for creating serial number labels, get a copy from the Reseller
website (see page vi) under Product Support Information in the Service and Support Library.
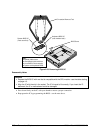
1. Attach the regulatory label in the recess in the bottom case.
2. Using any PC connected to a laser printer, create a new Word document using master serial label
template, enter the serial number and product number from the old serial label, and print the new
label on plain white paper. The new label does not have barcodes.
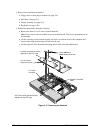
3. Carefully cut out the new serial label just inside the border and place it into the inner recess in the
bottom case. The bottom of the label goes toward the front of the case.
4. While holding the paper label in place, attach a serial label overlay into the outer recess. It covers
and protects the serial label.