


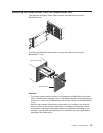


Installing
IDE
drives
Your
blade
server
has
two
connectors
on
the
I/O
board
for
installing
optional
2.5-inch
IDE
drives
(either
hard
disk
drives
or
flash
drives).
Each
IDE
connector
is
on
a
separate
bus.
Some
models
come
with
at
least
one
IDE
flash
drive
already
installed.
Attention:
To
maintain
proper
system
cooling,
do
not
operate
the
BladeCenter
unit
without
either
a
blade
server,
expansion
unit,
or
filler
blade
installed
in
each
blade
bay
for
more
than
1
minute
for
the
BladeCenter
unit
and
20
minutes
for
the
BladeCenter
T
unit.
Important:
Ensure
that
the
storage
capacities
and
speeds
of
the
drives
are
identical
when
configuring
or
replacing
drives
in
a
mirrored
configuration.
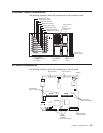
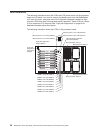
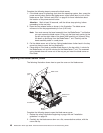
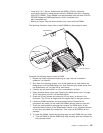
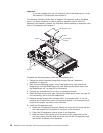
IDE drive
Riser card
Tray
Complete
the
following
steps
to
install
a
2.5-inch
IDE
drive.
Note:
Do
not
install
an
IDE
drive
into
IDE
connector
2
if
you
intend
to
also
install
an
optional
I/O
expansion
card.
The
I/O
expansion
card
occupies
the
same
area
as
the
second
IDE
drive.
1.
Read
the
safety
information
beginning
on
page
109
and
“Installation
guidelines”
on
page
33.
2.
Shut
down
the
operating
system,
turn
off
the
blade
server,
and
remove
the
blade
server
from
the
BladeCenter
unit.
See
“Removing
the
blade
server
from
the
BladeCenter
unit”
on
page
39
for
instructions.
3.
Carefully
lay
the
blade
server
on
a
flat,
static-protective
surface.
4.
Open
the
blade
server
cover
(see
“Opening
the
blade
server
cover”
on
page
40
for
instructions).
Chapter
4.
Installing
options
43