


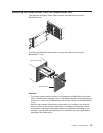

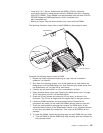


5.
Insert
the
riser
card
from
the
option
kit
into
an
IDE
connector
on
the
blade
server
I/O
board.
Important:
IDE
drives
must
be
installed
in
the
following
order:
IDE
connector
1
first,
then
IDE
connector
2.
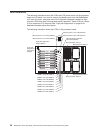
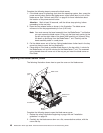
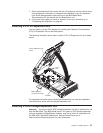
6.
Place
the
IDE
drive
tray
from
the
option
kit
over
the
riser
card
as
shown
in
the
illustration,
aligning
the
tray
with
the
screw
holes
on
the
I/O
board.
Two
of
the
screw
holes
have
screws
in
them.
7.
Remove
the
tray
temporarily;
then,
remove
the
two
screws
from
the
screw
holes
on
the
I/O
board
and
replace
the
tray.
Secure
the
tray
to
the
I/O
board
with
screws
from
the
kit.
8.
Set
any
jumpers
or
switches
on
the
IDE
drive.
Important:
Both
IDE
drives
must
be
set
to
Master.
Attention:
Do
not
press
on
the
top
of
the
IDE
drive.
Pressing
the
top
could
damage
the
IDE
drive.
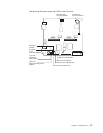
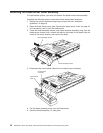
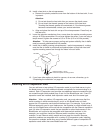
9.
Place
the
IDE
drive
into
the
tray
and
push
it,
from
the
rear
edge
of
the
IDE
drive,
into
the
connector
on
the
riser
card
until
the
IDE
drive
moves
past
the
lever
at
the
back
of
the
tray.
The
IDE
drive
clicks
into
place.
10.
If
you
have
other
options
to
install
or
remove,
do
so
now;
otherwise,
go
to
“Completing
the
installation”
on
page
62.
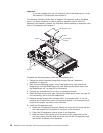
Installing
memory
modules
The
following
notes
describe
the
types
of
dual
inline
memory
modules
(DIMMs)
that
the
blade
server
supports
and
other
information
that
you
must
consider
when
installing
DIMMs:
v
The
processor
board
contains
eight
DIMM
connectors
and
supports
two-way
memory
interleaving.
v
The
DIMM
options
supported
for
your
blade
server
are
256
MB,
512
MB,
and
1
GB
(2
GB
when
available).
Your
blade
server
supports
a
minimum
of
512
MB
and
a
maximum
of
8
GB
(16
GB
with
availability
of
2
GB
DIMMs)
of
system
memory.
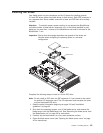
v
Your
blade
server
comes
with
two
DIMMs
installed
in
the
DIMM
4
and
DIMM
8
memory
connectors
(J9E1
and
J9H1,
respectively).
When
you
install
additional
DIMMs,
be
sure
to
install
them
as
pairs
in
the
connectors
and
order
shown
in
the
following
table.
Pair
DIMM
connectors
First
4
and
8
(J9E1,
J9H1)
Second
3
and
7
(J9D1,
J9G1)
Third
2
and
6
(J9C2,
J9F1)
Fourth
1
and
5
(J9B3,
J9E2)
v
Both
DIMMs
in
a
pair
must
be
the
same
size,
type,
and
technology.
You
can
mix
compatible
DIMMs
from
various
manufacturers.
v
If
you
are
using
the
hot-spare
memory
feature,
all
DIMMs
that
are
installed
in
the
blade
server
must
be
the
same
size,
type,
and
technology.
If
you
are
not
using
the
hot-spare
memory
feature,
the
DIMMs
of
one
memory
pair
do
not
have
to
match
the
DIMMs
of
the
other
memory
pairs.
To
use
the
hot-spare
memory
feature,
at
least
two
DIMM
pairs
must
be
installed
in
the
blade
server.
The
hot
spare
memory
feature
is
enabled
using
the
Configuration/Setup
Utility
program
(see
“Configuration/Setup
Utility
menu
choices”
on
page
12
for
information).
44
BladeCenter
HS40
Type
8839:
Hardware
Maintenance
Manual
and
Troubleshooting
Guide