


Removing and Installing Baseboard Components 65
Installing a Processor
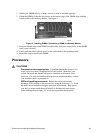
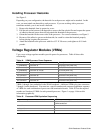
See Figure 5.
1. Observe the safety and ESD precautions at the beginning of this chapter and the additional
cautions on page 63.
2. Remove the new processor from its antistatic package and place it on a grounded, static-free
surface or conductive foam pad.
3. Attach the processor handle to the processor. For more information, see "Installing Processor
Handles" on page 65.
4. If necessary, attach the heatsink to the processor. For more information, see "Installing
Processor Heatsinks" on page 66.
5. Orient the processor correctly in the chassis. See Figure 5 and Figure 1.
6. Slide the processor into the guides on each side of the processor slot and press the processor
downward firmly into the baseboard connector.
7. Insert and tighten two screws at the top of the processor handle.
Removing Processor Retention Mechanisms
See Figure 5.
1. Observe the safety and ESD precautions at the beginning of this chapter and the additional
cautions on page 63.
2. Make sure that the processor has been removed from the baseboard. To remove the processor,
see "Removing a Processor" on page 64.
3. With a long bladed screwdriver, remove the two screws at the base of the processor retention
mechanism.
4. Remove the retention mechanism from the baseboard.
Installing Processor Retention Mechanisms
See Figure 5.
1. Observe the safety and ESD precautions at the beginning of this chapter and the additional
cautions on page 63.
2. With a long bladed screwdriver, tighten the two screws at the base of the processor retention
mechanism.
Installing Processor Handles
Depending on your configuration, the handles for the processor might not be attached to the
processor. In this case, you must attach a handle to each processor.
See Figure 5.
1. Orient the handle as shown in the Figure 5.
2. Press the handle into the processor until the handle snaps into place.