


• If you are using a proxy server, then temporarily disable it to load the Web page correctly.
2 Click Settings > Paper Menu > Custom Names.
3 Type a name for the paper type, and then click Submit.
4 Select a custom type, and then verify that the correct paper type is associated with the custom name.
Note: Plain Paper is the factory default paper type for all user‑defined custom names.
Configuring a custom name
If the printer is on a network, then you can use the Embedded Web Server to define a name other than Custom Type [x]
for each of the custom paper types loaded into the printer.
1 Open a Web browser, and then type the printer IP address in the address field.
Notes:
• View the printer IP address on the printer home screen. The IP address appears as four sets of numbers
separated by periods, such as 123.123.123.123.
• If you are using a proxy server, then temporarily disable it to load the Web page correctly.
2 Click Settings > Paper Menu > Custom Types.
3 Select a custom name you want to configure, select a paper or specialty media type, and then click Submit.
Printing
The use of print preview and the selection of desired printing preferences such as duplex, margins and paper size can
ensure that the print job output will appear as desired.
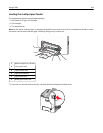
Printing forms
Use the Forms and Favorites application to quickly and easily access frequently used forms or other information that
is regularly printed. Before you can use this application, first set it up on the printer. For more information, see “Setting
up Forms and Favorites” on page 89.
1 From the printer home screen, navigate to:
Forms and Favorites > select the form from the list > enter the number of copies > adjust other settings
2 Depending on your printer model, touch , , or Submit.
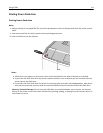
Printing a document
Printing a document
1 From the Paper menu on the printer control panel, set the paper type and size to match the paper loaded.
2 Send the print job:
Using C748x 108