


2 Click +.
3 If necessary, click Add Printer or Scanner or Add Other Printer or Scanner.
4 Click the IP tab.
5 Type the IP address of the printer in the address field, and then click Add.
In Mac OS X version 10.4
1 From the Finder, navigate to:
Applications > Utilities
2 Double‑click Printer Setup Utility or Print Center.
3 From the Printer List, choose Add, and then click IP Printer.
4 Type the IP address of the printer in the address field, and then click Add.
b For AppleTalk printing:
Notes:
• Make sure AppleTalk is activated on your printer.
• This feature is supported only in Mac OS X version 10.5 or earlier.
In Mac OS X version 10.5
1 From the Apple menu, navigate to:
System Preferences > Print & Fax
2 Click +, and then navigate to:
AppleTalk > select the printer from the list > Add
In Mac OS X version 10.4
1 From the Finder, navigate to:
Applications > Utilities
2 Double‑click Printer Setup Utility or Print Center.
3 From the Printer List, click Add.
4 Click Default Browser tab > More Printers.
5 From the first pop‑up menu, select AppleTalk.
6 From the second pop‑up menu, select Local AppleTalk Zone.
7 Select the printer from the list, and then click Add.
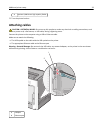
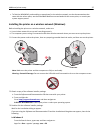
Installing the printer on an Ethernet network
Note: Make sure you have completed the initial setup of the printer.
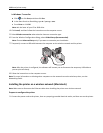
For Windows users
1
Obtain a copy of the software installer package.
• From the Software and Documentation CD that came with your printer.
• From our Web site:
Go to
http://support.lexmark.com, and then navigate to:
SUPPORT & DOWNLOAD > select your printer > select your operating system
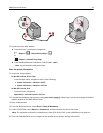
2 Double‑click the software installer package.
Wait for the installation dialog to appear.
Additional printer setup 41