


PH50, XL50, XL21 series Set-up and Installation Manual
26
1.4.1.2. Operation mode
This product has two operation modes: “normal mode” and “advanced mode”. Use the normal
mode in usual operation. Switch to the advanced mode when you set up or adjust the product.
Two modes can be switched by [NORMAL] button when there is no adjustment menu on screen.
1.4.1.2.1. Normal mode
The normal mode allows you to turn off the power by [POWER] button, to display status
information by [DISPLAY] button, to change the operation mode by [NORMAL] button and to call
a display memory by number buttons.
Adjustment menus cannot be called in the normal mode.
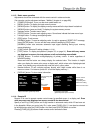
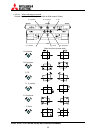
1.4.1.2.2. Advanced mode
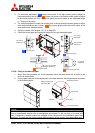
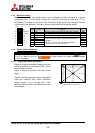
In advanced mode, status information appears on screen as
described in right figure.
1. Status display:
• “!” mark appears when values in a menu are
changed. It is also displayed when a value is
automatically changed by internal process.
• In
C
C
h
h
a
a
n
n
g
g
e
e
r
r, “☀” mark appears when the status of
a spare lamp is other than “NEW”.
• During lamp position auto calibration (for
C
C
h
h
a
a
n
n
g
g
e
e
r
r) and initial sensor value obtaining,
the operating status is noticed with figures such as “3”, “4” or “7”. When the function has
worked correctly, it disappears after 5-minute displaying.
2. Input port: Displaying current input port.
3. Comment:
• “NO SIGNAL” is displayed when any image signal is not input.
• “TEST *” is displayed during internal test patterns displaying.
• “MUTE” is displayed during picture mute.
4. Set ID: Displaying a set ID.
! ANALOG NO SIGNAL ID01
Status In
p
ut
p
ort Comment Set ID