


Page 96 of 332 Chapter 6 — Installing the Option 11C Mini
553-3021-209 Standard 3.00 April 2000
17
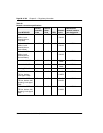
If Ethernet is required, insert an industry-standard Medium Access Unit
(MAU) directly into the Ethernet connector at the back of the chassis.
The Option 11C Mini system does not include the MAU. Insert the
Ethernet cable into this MAU. See “Chapter 15 — Installing and
connecting SDI and Ethernet ports” on page 191. Refer to Procedure 26:
“Connecting the Ethernet cable” on page 206.
18
Make sure that the DIP switch settings on the power supply are set to the
correct values for ringing voltage, ringing frequency, and message
waiting voltage. See Table 2 on page 33 for the DIP switch settings.
19
Connect the system to an AC power source. Make sure that the source
matches the label on the back of the chassis. Turn the power switch to
“ON”.
20
Start and test system. See “Starting the Option 11C Mini” on page 209.
Refer to the following procedures:
— Procedure 27: “Start-up procedure for a new system installation,
using the MSC card” on page 210
— Procedure 28: “Start-up procedure for a previously installed system”
on page 211
21
Install the system software. See “Installing software in a new system” on
page 215. Refer to Procedure 29: “Installing software” on page 216.
22
Connect the M2616 or the M2008 administration and maintenance
telephone with display. See “Chapter 17 — Connecting the telephones”
on page 229.
23
Install, if you have not already installed, and activate the telephones. See
“Chapter 17 — Connecting the telephones” on page 229.
24
Connect the trunks to the system. See “Chapter 18 — Connecting the
trunks” on page 253.
25
Perform a system backup using Overlay 43.
26
Install any remaining equipment. See “Chapter 19 — Connecting an
external alarm” on page 279.