


4 – Installation
Install Firmware
59042-06 A 4-19
0
4.3.1
Using SANsurfer Switch Manager to Install Firmware
To install firmware using SANsurfer Switch Manager, do the following:
1. Select a switch in the topology display and double-click to open the
Faceplate display. Open the Switch menu and select Load Firmware.
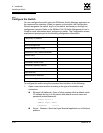
2. In the Firmware Upload window, click the Select button to browse and select
the firmware file you want to upload.
3. In the Firmware Upload window, click the Start button to begin the loading
process. When the firmware is finished loading, the Bytes Transferred field
displays the number of bytes that have been transferred.
4. Click the Close button to close the Firmware Upload window.
5. SANsurfer Switch Manager will attempt a hot reset, if possible, to activate
the firmware without disrupting data traffic. Click the OK button to reset the
switch and activate the new firmware. During a non-disruptive activation, all
Logged-In LEDs are illuminated. If a non-disruptive activation is not
possible, SANsurfer Switch Manager gives you the opportunity to reset the
switch and perform a disruptive activation.
4.3.2
Using the CLI to Install Firmware
To install firmware using the CLI when an FTP server is present on the
management workstation, do the following:
1. Connect to the switch through the Ethernet or the serial port and open a
Telnet session.
2. Enter the following account name and password:
SANbox2 Login:admin
Password: password
3. To start an admin session, enter the following:
SANbox2 $> admin start
4. Retrieve the firmware file. The device on which the firmware file is stored
must be running an FTP server. Enter the following command to retrieve the
firmware file from the specified IP address:
SANbox2 (admin) #> image fetch username 10.0.0.254
firmwarefilenametoload firmwarefilenameonswitch
Connected to 10.0.0.254.
Note: If prompted for your password, enter your password (for that IP
Address) and press the Enter key.