


WEBBING FILMS WITH A RELEASE LINER
24
The following are the basic webbing procedures for
webbing films with a release liner:
• Select films slightly wider than the image to allow for a
border without film waste. A border of 1/8" to 1/4"
(3-6mm) is adequate.
• Load and center the films on top and bottom unwind
shafts with the dull adhesive side facing out and the
unwind brake tension released.
NOTE: Check if the film widths of the lower and
upper web are the same!
• TOP FILM: (film with a release liner) Pull the film
down from the top unwind shaft, behind the top center
idler and place it evenly over the face of the top roller.
• Place a spare core over the front top wind-up idler.
Separate the film from the release liner. Attach the
release liner to the spare core using a piece of tape.
• BOTTOM FILM: Pull the film up from the bottom
unwind shaft, behind the front bottom idler and place it
evenly over the top film draped across the face of the top
roller. The two films will stick together.
• Set the Shim Wheels to 1/16" (2mm) to allow for the
thickness of the leader-board.
• Use a leader-board to push the film(s) through the nip.
• Lower the top roller and pivot the in-feed table into
position.
• Moving to the rear of the laminator, use the foot switch
to advance the leader-board.
• Feed the leader-board over the first chill idler and under
the second chill idler.
NOTE: For top and bottom film combinations of
10 mil (250 microns) or less, feed over the first idler
and under the second. For film combinations of 10 mil
(250 microns) or over, feed over both chill idlers.
• Raise the top pull roller and advance the leader-board
through the pull rollers.
• Holding the leader-board up against the top edge of the
top pull roller, lower the roller. Make sure the rear Shim
Wheels are set to 0" (0mm).
• Return to the front of the laminator and set the front
Shim Wheels to –1/16" (-2mm).
• Using the foot switch advance the films applying light
unwind brake tension gradually on both unwind shafts
until there are no wrinkles in the film as it goes into
the nip.
YOU ARE NOW READY TO FEED IMAGES!
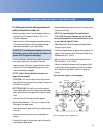
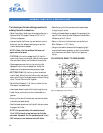
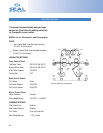
Figure 19. Webbing for North America
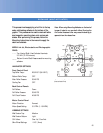
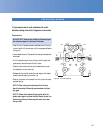
Figure 20. Webbing for Europe & Asia
Top
Pull
Front Top
Supply Shaft
Rear Top
Supply Shaft
Bottom
Main
Bottom
Chill
Idler
Shim Wheel
Print Guide
Front Table
Front
Rear
Front
Bottom
Wind-up
Rear
Bottom
Wind-up
Rear
Bottom
Supply
Shaft
Front
Bottom
Supply
Shaft
Front
Roll
Easel
Rear Top
Wind-up
Top
Idler
Rear
Table
Covered
Foot
Switch
Fan
Tube
Bott
Idler
Shim Wheel
Covered
Foot
Switch
Roller
Roller
Top
Main
Roller
Pull
Roller
Bott
Idler
Chill
Idler
Rear
Roll
Easel
Front Top
Wind Up
Top
Main
Front Top
Supply Shaft
Rear Top
Supply Shaft
Bottom
Pull
Chill
Idler
Shim Wheel
Print Guide
Front
Table
Front
Rear
Front
Bottom
Wind-up
Rear
Bottom
Wind-up
Rear
Bottom
Supply
Shaft
Front
Bottom
Supply
Shaft
Rear
Roll
Easel
Front
Roll
Easel
Rear Top
Wind-up
Front Top
Wind-up
Top
Idler
Rear
Table
Covered
Foot
Switch
Fan
Tube
Bott
Idler
Covered
Foot
Switch
Roller
Top
Pull
Roller
Chill
Idler
Roller
Bottom
Main
Roller
Shim Wheel
Bott
Idler