


Chapter 6. Setting Up a 485 Network
May 2002 T-38324-A Page 6-3
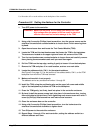
Use Procedure 6-1 to make the necessary changes to VSMain.ini.
Procedure 6-1. Editing VSMain.ini for a 485 Network
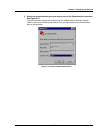
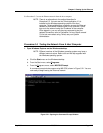
1. Open VSMain.ini using Notepad.
a. Click the Start menu on the Windows NT desktop.
b. From the Start menu, select Programs.
c. From the Programs menu, select Accessories.
d. From the Accessories menu, select Notepad.
e. Click the File menu in Notepad.
f. From the File menu, select O
pen.
g. In the file name field enter “C:\Windows\VSMain.ini.”
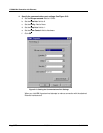
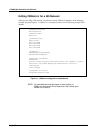
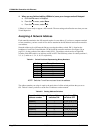
2. Locate the heading in VSMain.ini labeled [Communications] and enter a single
port for an SDLC channel.
Typically, a 485 network only has a single SDLC channel to which all the controllers are
connected. Your changes to this section of VSMain.ini should end up looking similar to
this:
[Communications]
Detachable=0
#Ports=1
CommOcx1=SDLC
In the above sample, the network consists of a single SDLC channel to which all the
computer and controllers are connected.
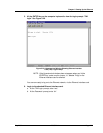
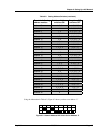
3. Locate the heading in VSMain.ini labeled [Comm1Devices]. Create an entry for a
device that is a controller, and identify the controller as a Device Control Module
(DCM).
Each device is labeled as ‘Device1,’ ‘Device2,’ and so on. ‘Device1’ is the first controller
on the network, ‘Device2’ is the second controller on the network until the list finishes
with the last controller on the network. Your changes to this section of VSMain.ini should
end up looking similar to this:
[Comm1Devices]
#Devices=4
Device1=DCM
Device2=DCM
Device3=DCM
Device4=DCM
In the above sample, there are four devices connected to the network and each one is a
DCM.