


Zebra S-Series User’s Guide 85
$GMXVWLQJ'DUNQHVVIRU´,Q6SHFµ%DU&RGHV
All direct thermal and thermal transfer materials do not use the same
darkness setting. The best way to check for the proper darkness is to use a
bar code verifier that actually measures bars/spaces and calculates the
Print Contrast Signal (PCS) ratio. Without the assistance of a verifier,
your eyes and/or the scanner to be used in the system may be used for
picking the optimum darkness setting. What follows is a simple yet
effective method for adjusting the darkness to print “in-spec” bar codes.
1. Load media according to the appropriate media loading and ribbon
loading instructions beginning on page 11. Ensure that the proper
print method has been selected.
2. With power OFF, press and hold the FEED key.
3. Turn the printer power ON, then release the FEED key. The printer
begins printing test labels.
4. Print a label, then press the PAUSE key. The label contains several bar
codes as well as other printer information. Normal bar codes are
printed in a horizontal format as they feed out of the printer. Rotated
bar codes are printed in a vertical format.
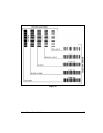
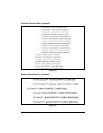
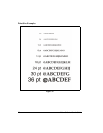
5. Compare the test label printed to the bar codes in Figure 29 on
page 87. If the test label appears too dark or too light, increase or
decrease the darkness setting accordingly.
6. Resume printing by pressing the PAUSE key again. Print a few labels
at the new setting and verify that proper “in-spec” bar codes are being
printed. Repeat steps 4, 5, and 6 until satisfied.
7. To stop printing test labels, press the PAUSE key, then press the
CANCEL key.