


printing. The PAPER/RIBBON light flashes to indicate this condition. To remove the
backing from the Rewind Spindle, see page 9.
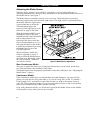
Cutter Mode
(Factory-Installed Cutter Option Required)
When the media is in the rest (idle) position, the start of the label to be printed is
directly under the printhead. The printer prints the entire label and automatically cuts
the label after it is printed. The Cutter Catch Tray “catches” the completed labels.
The Cutter automatically cycles through one cutting motion when the printer’s power is
turned ON. When printing labels, the Cutter activation is determined by a command sent
to the printer by the host computer, either a ZPL II command or a command from a
different software driver. To disable the cutter, turn the printer’s Power Switch OFF and
simply unplug the connecting cable from the bottom of the Cutter Module.
Note: Do not exchange Cutter Modules between different printers. The Cutter Module
adjustments are optimized during installation to work with a particular printer, and may not
perform correctly if the Module is placed on a different unit.
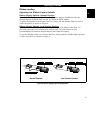
External Rewind Mode
(External Rewinder Required)
Some applications call for the media to be rewound onto a core as the labels are printed.
The Stripe printer, however,
does not
have an internal Media Rewind capability–the
Backing Rewind Spindle
is not
designed to rewind label stock. You will need an
external rewinder for this application.
When the media is in the rest (idle) position, the start of the next label is directly under
the printhead. After the label is printed, the media feeds forward until the start of the next
label is under the printhead. The media never backfeeds in this mode. When the printer
completes a batch of labels, printing will stop. The speed and tension of the rewind
operation is strictly a function of the external rewind unit.
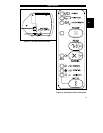
Operator Controls
This section discusses the functions of the various controls and indicators on the Stripe
printer. The operator should become familiar with each of these functions.
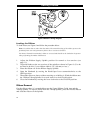
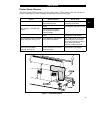
AC Power ON/OFF Switch
This switch is located on the left side of the printer near the AC Power Cord and Fuse.
See Figure 1. The AC Power Switch should be turned OFF (0) before connecting or
disconnecting any cables.
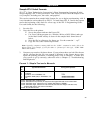
Turning the switch ON (1) activates the printer and causes it to perform a Power ON
Self Test as it begins operation. Turning the printer power ON while holding down
certain front panel keys will launch additional Printer Self Tests following the Power
ON Self Test. See Chapter 4.
External influences such as lightning storms or unwanted noise on the power or data
cables may cause erratic printer behavior. Turning the AC Power OFF and back ON may
re-establish proper printer operation.
Operation
18